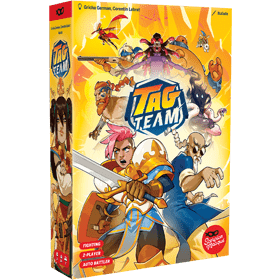
Tag Team
 Um novo jogo de luta para 2 jogadores chegou à arena!
Inspirado nos clássicos jogos de luta de arcade, Tag Team é um jogo de batalha automática combinado com um sistema de construção de baralho. Monte sua equipe de 2 lutadores e crie uma sinergia imbatível combinando seus 2 baralhos exclusivos! Cada personagem possui suas próprias técnicas e golpes especiais.
Você começa com um baralho de apenas 2 cartas, e a Luta se desenrola automaticamente: vire suas cartas uma a uma e aplique seus efeitos. Ao final de cada rodada, você pode aumentar a pressão sobre a equipe adversária: programe seu baralho adicionando estrategicamente novas cartas sem reorganizar as que já estão lá. Supere seu oponente em estratégia para dar o golpe decisivo!
Descubra o que faz sua dupla funcionar, execute combos devastadores e domine seu oponente bloqueando seus ataques com maestria. O timing é tudo se você quiser sair vitorioso e nocautear seu adversário!
Rodada 1... Lutem!
Número de jogadores: 2
Duração do jogo: 7 mn
Complexidade: 3 / 5
Jogue Tag Team e 1256 outros jogos online.
Sem downloads, direto no seu navegador.
Com seus amigos e milhares de jogadores do mundo inteiro.
Grátis.

Jogue Tag Team e 1256 outros jogos online.
Sem downloads, direto no seu navegador.
Com seus amigos e milhares de jogadores do mundo inteiro.
Grátis.

Sumário de Regras
Tag Team is an auto battler and a deckbuilder... with a twist!
What’s a deckbuilder? A deckbuilder allows you to add cards to your personal deck during the course of the game, making it stronger and more effective against your adversary.
What’s an auto battler? An auto battler starts with a preparation phase full of choices, followed by a fight phase where players can no longer change anything. You just have to see how it plays out
What’s the twist? In Tag Team, you’ll never shuffle your deck. You’ll strategically add cards to it without changing the order of the cards already there!
In Tag Team, players will combine the unique decks of 2 Fighters to battle against their opponent over a series of Rounds. You’ll start with a Fight deck composed of only 2 cards (one for each of your Fighters).
• It’s time to Fight! Simultaneously reveal one card at a time, and follow the instructions on the cards. When your 2 cards have been played, it’s the end of the Round.
• Now you Build! Draw 3 cards from your Build deck (composed of your 2 Fighters’ decks) and add one of those cards to your Fight deck without changing the order of cards already there... Will your Attack card line up with your Opponent’s Block, or avoid it?
• A new Round begins, you Fight again, but this time the Round will be 3 cards long. Fight and Build until one is KO!
The description above is from the publisher, do NOT edit
The game proceeds in Rounds. Each Round has two steps:
- FIGHT! Step
- BUILD! Step
Golden Rule: Any effect on a card or Fighter board overrules any rule in this rulebook.
1. FIGHT! Step
This step is broken into Turns. All card Actions are considered simultaneous.
- Turns: Both players simultaneously flip over the top card of their Fight Deck and place it face-up. Both players simultaneously perform the Action(s) on their revealed card.
- Active Fighter & Partner: The Fighter whose card was revealed is the Active Fighter for that Turn. They perform all actions (unless stated otherwise) and are the default target for the opponent. The other Fighter on their team is the Partner.
- End of Step: The FIGHT! Step continues until both players have revealed the final card in their Fight Deck.
2. BUILD! Step
- Draw Cards: Draw the top 3 cards from your Build Deck.
- Add a Card: Secretly select one of the 3 cards. Add it anywhere into your Fight Deck (on top, on the bottom, or between any two existing cards).
- Do Not Reorder: You cannot change the order of the cards already in your Fight Deck.
- Discard Cards: Place the 2 unchosen cards on the bottom of your Build Deck in any order.
- New Round: A new Round begins, starting with the FIGHT! Step.
Instant Bonus Cards
- Some cards have an Instant Bonus icon.
- When you add one of these cards to your Fight Deck during the BUILD! Step, you must tell your opponent the bonus you gained and apply it immediately.
- This is done after both players have added their cards. You do not reveal the card or its position.
End of the Game
The game ends in one of three ways:
- Knocked Out (KO): If a Fighter's HP marker is on the KO space at the end of a Turn, that player loses.
- Double KO: If Fighters on opposing teams are KO'd in the same Turn, the game is a Draw.
- Depleted Build Deck: If you cannot draw 3 cards from your Build Deck during the BUILD! Step, the game is a Draw.
Actions & Keywords
- Mandatory Actions: All Actions on your revealed card are mandatory.
- Power: A Fighter's Power is the number of cubes in their Power Supply. This determines Attack strength.
- Power for Turn: A Fighter's Power for an Attack is their Power at the beginning of the Turn. Power gained or lost during the current Turn does not affect that Turn's Actions. Power can never be below 0.
- Keywords:
- You: The Active Fighter.
- Opponent: The other player's Active Fighter.
- Opponents: The other player's Active Fighter AND their Partner.
- THEN: Actions after this keyword must be performed after the previous Actions (regardless of success).
Basic Actions
- Attack: The target (default is the Opponent) loses HP equal to your Active Fighter's Power.
- Block: Negate all Attacks performed by your Opponent and/or their Partner this Turn.
- Blocks do not negate Direct Damage or other effects.
- Bonus Action: If a Block successfully negates at least one Attack (even a 0-Power Attack), it activates its Bonus Action. This triggers only once per Turn.
- Direct Damage: The target loses the specified amount of HP.
- This is not an Attack and cannot be Blocked.
- It is affected by "Stop" icons and triggers Health Track icons.
- If combined with an Attack and Blocked, the Attack is negated but the Direct Damage is still applied.
- Heal: Gain the specified HP. Move your Health marker up.
- If HP is lost simultaneously, apply the net difference.
- Cannot Heal a Fighter at KO.
- Healing is interrupted by "Stop" icons.
- Power Gain/Loss: Add or remove the specified number of Power cubes from your Power Supply.
- Partner Icon: The Action involves your Partner (e.g., Partner gains 1 Power).
- Opponent's Partner Icon: The Action targets your Opponent's Partner.
- Transfer: Move an item (like a Power cube) from one Fighter to another. You must Transfer as much as you can, up to the required amount.
- Cancel (X Icon): The Opposing Fighter's card is completely ignored.
- Success Icon: A Bonus Action that triggers if the card's main action was successful (e.g., an Attack was not Blocked, or a Block negated an Attack).
Health Track Rules
- A Fighter's Health marker can never go above their Max HP or below the last space (KO).
- Health Track Icons: When a marker lands on or passes through a space with an icon, that icon's action triggers.
- This happens after all Health markers have finished moving.
- If multiple icons are passed, all activate simultaneously.
- Moving out of an icon space does not trigger it.
- Stop Icon: This icon immediately stops the Health marker's movement (up or down) from Attacks, Direct Damage, or Healing.
Fighter-Specific Rules
Jeanne (The Divine Shield)
- Special Track: Divine Voice Track.
- Setup: Place 1 Special marker on the central "Halo" space.
- Divine Voice: When Jeanne gains a "Divine Voice," move the Special marker one space clockwise.
- Top-Right Space: When the marker lands here, gain 1 Power Cube.
- Bottom-Left Space: When the marker lands here, add 1 Power Cube to your Partner.
Le Wild Bunch (The Outlaw Band)
- Special Material: 1 Sheriff Token.
- Setup: Place the Sheriff token next to the Wild Bunch's board.
- Damage/Recovery: All spaces on the Wild Bunch's HP track are valued at 'one'. The marker only moves one space up or down per Turn, regardless of total damage or healing.
- If (HP Loss > HP Recovery), move marker 1 space down.
- If (HP Recovery > HP Loss), move marker 1 space up.
Bödvar (The Berserker)
- Setup: Board is double-sided (Bödvar/Berserker Bear). Start "Bödvar" (human) side up. Place 1 Special marker on the bottom "0" space of the Rage track.
- Special Cards: Some cards have separate effects for Bödvar (human) and Berserker Bear. Only apply the effect for the currently visible face.
- Rage Track: When a card increases Rage, move the marker one space up.
- Metamorphosis: When the marker reaches the top space of the Rage track:
- Apply the space's effect (Gain 3 Power Cubes).
- Flip the board to the "Berserker Bear" face.
- Transformation Rules:
- During the Turn Bödvar transforms, he is not affected by any HP loss or recovery.
- All tokens (e.g., Flame, Concentration) on Bödvar are transferred to the Berserker Bear.
- Berserker Bear:
- The Bear's initial HP is set to Bödvar's Power (number of cubes) at the moment of transformation. (Power cubes beyond 15 are ignored for this initial setting).
- This initial HP is not a limit; the Bear can later Heal up to 15.
- FAQ:
- Transe Mystique: Only an Attack (not Direct Damage) triggers this card's additional damage effect. Bödvar (not his ally) must be the one Attacked.
Shango (Guardian of Fire and Thunder)
- Special Material: 5 Flame tokens.
- Setup: Place the 5 Flame tokens next to Shango's board.
- Ignite (Action): Place 1 Flame token on your Opponent.
- If the Opponent already had 0 Flame tokens: You must also remove all Flame tokens from their Partner and return them to Shango's supply.
- Ignite is not an Attack and cannot be Blocked.
- Incineration: A Fighter with 5 Flame tokens immediately loses the game.
- This loss overrules a simultaneous KO (it is not a draw).
- This is not HP loss; it does not trigger HP track icons.
- Fiery Power (Attack): This specific Attack deals HP loss equal to (Shango's Power) + (1 per Flame token on the target).
- FAQ:
- An unblocked Shango Attack is considered "successful" even if it deals 0 damage.
- A single Block cancels Shango's "Foudre" (Lightning) Attack against all targets.
Maman Brijit (The Immortal Witch)
- Immortality (HP Track):
- Maman Brijit has two KO spaces. If her marker is on one at the end of the Turn, she is KO.
- If her marker is moved past the KO spaces to the "+1 Power Cube" space, she returns to life.
- When she returns: She gains 1 Power, and her HP marker moves to the "4" space at the end of the Turn.
- If her marker reaches the bottom-most space, she ceases to lose HP; further losses are ignored.
- FAQ:
- Rhum Arrangé: She takes the 1 Direct Damage even if the Attack is Blocked.
- Jeunesse Éternelle: She only gains the 2 Power if she successfully Recovers HP. This card only cancels the Heal action of an opponent, not their entire card. If used against Jeanne's "Vision divine," Maman Brijit steals all healing (for both Jeanne and her Partner).
Mephisto (Emissary of Darkness)
- Special Material: 1 double-sided Serpent token.
- Setup: Flip the Serpent token; place it next to the board with the resulting face visible.
- Special HP Icon: When Mephisto's HP marker reaches or crosses this space, flip the Serpent token (do not apply its effect).
- FAQ:
- You must use the face of the token that is visible when the card is played.
- Flipping the token via the HP track does not activate the new face's effect that Turn.
- Colère des damnés: Is Direct Damage (affected by Stops, triggers icons).
- Bienvenue en Enfer! (Welcome to Hell!): If Mephisto plays this card, he wins the game even if he is Incinerated (by Shango) or his Partner is KO'd during that same Turn. If you lose in any way while this card is active, you win.
Le Petit Peuple (The Little People)
- Setup:
- Place 1 Special marker on the bottom space of the Spirits track.
- Place one HP marker on each of the three Character portraits.
- Choose Character: Before the game, choose one Character. Move their HP marker to their track's starting space and apply its effect.
- Three HP Tracks: Only the active Character (whose marker is on their track) can lose or recover HP.
- Becoming a Spirit:
- Tracks have no KO space. When a Character loses their last HP, move their marker to the "Spirit" space.
- That Character is now a Spirit and cannot recover HP. The Turn continues.
- End of Turn (After a Spirit is made): Before revealing the next card, in this order:
- Advance the marker 1 space up the Spirits track.
- Choose your next active Character.
- Place the HP marker on the top space of that new Character's track and apply its effect.
- Special Defeat Condition: They are not KO if all three become Spirits. They are KO only if all three Characters are Spirits (marker at the top of the Spirits track) at the start of the Turn when the "Toutes les légendes ont une fin" card is revealed.
- FAQ:
- They begin the game with 1 Spirit (for card effect purposes).
- HP loss does not carry over to the next Character if one becomes a Spirit mid-Turn.
- They can still perform card actions when all are Spirits (but not lose/recover HP).
- If "Toutes les légendes..." is removed by Wong Fei-Hung, they are invincible.
Mordred (The Black Knight)
- Setup: None.
- Invocation (Summoning) Cards:
- When a card is flipped, the new action completely replaces the old one.
- The new action is not available until the next time the card is played.
- The card stays on its new face for the rest of the game.
- FAQ:
- Poignard dans le Dos: If Blocked, Mordred still Attacks (this triggers the Block's Bonus Action).
- Exécution: Is Direct Damage (affected by Stops, triggers icons).
- Card effects use the number of Spirits at the start of the Turn (a Character becoming a Spirit during the Turn doesn't count).
Milady (The Spy Captain)
- Special Material: 11 Intrigue (Scheme) tokens.
- Setup: Shuffle the 11 tokens face-down into a pile next to her board.
- Prepare an Intrigue: Place the top token from the pile, face-down, above her board. If the pile is empty, ignore this action.
- Reveal an Intrigue: Triggered by card Actions or her HP track icon.
- Randomly choose one of the Prepared (face-down) tokens and flip it.
- Apply its effect, then remove the token from the game.
- Timing of Reveals:
- From Card Actions: The token's actions are considered part of that card and resolve simultaneously with the Opponent's card.
- From HP Track: These activate after all card actions are resolved. (This means they can move HP markers that were on Stop spaces).
- Poison Token:
- Effect: Opponent takes Direct Damage equal to half their current HP, rounded down. (e.g., 11 HP = 5 damage).
- A Fighter cannot be KO'd by Poison.
- Timing: Poison always activates last, after all other Intrigue actions are resolved. It applies to the new HP total (after other damage/healing).
- Intrigue Token Effects (Complete List):
- Attack and Reveal an Intrigue
- Attack both opposing Fighters
- Your Partner Recovers 6 HP
- ALL Fighters take 1 Direct Damage
- Gain 2 Power Cubes
- Your Partner gains 2 Power Cubes
- Reveal an Intrigue and your Partner gains 1 Power Cube
- You and your Partner each gain 1 Power Cube
- Poison
- FAQ:
- Le Regard qui Tue: Milady (not her ally) must be Attacked (not take Direct Damage) to trigger the reveal.
- Revealed tokens are removed from the game permanently.
Golem (The Colossal Protector)
- Special Material: 1 Golem (Golem's Presence) token.
- Setup: Place the Golem token next to Golem's board.
- Using the Token:
- If the token is on Golem's Partner and that Partner is Attacked (and not Blocked), the Partner loses 0 HP.
- The token is then returned to the Golem's supply.
- The token only protects from Attacks, not Direct Damage.
- Réanimation (Reanimation):
- The card following Réanimation is activated twice.
- The 2nd activation acts as a new Turn only for the Golem, using the new game state (e.g., new tokens, Power levels).
- If Attack: It's 2 separate Attacks (can bypass a Stop twice).
- If Block: If the 1st activation was successful, the Bonus Action triggers again.
- Vs. Opponent Block: If the Opponent Blocked, both Attacks are Blocked, but the Opponent's Bonus Action triggers only once.
- If Steal: It steals twice.
- Vs. Point de Pression: If Réanimation is removed, its effect (next card x2) still happens. If the affected card is removed, it still activates twice before being removed.
Wong Fei-Hung (The Old Master)
- Special Material: 2 Concentration tokens.
- Setup: Place the 2 tokens next to his board.
- FAQ:
- ...Plus dure sera la chute: Wong takes his token back if this Attack is Blocked. He still Attacks (with reduced Power) even if the Opponent has less Power than him. If Maman Brijit changes the target, Wong uses the Power of the original target (Maman Brijit).
- Équilibre spirituel: Wong's Power does change to match his Partner's if his Partner has less Power.
Ching Shih (The Pirate Queen)
- Special Track: Navigation Track.
- Setup: Place 1 Special marker on the "0" space of the Navigation track.
- Navigation Track: When she gains Ships, move the marker up. The maximum is 20 Ships; gains beyond 20 are ignored.
- FAQ (Terreur des Mers "20 Ships" Action):
- This is a Direct Damage action (triggers HP icons, cannot be Blocked).
- If used on Le Petit Peuple, it only reduces the currently active Character's track to 1 HP.
- Vs. Maman Brijit: If Maman Brijit plays "Rhum Arrangé," her HP is set to 1, she Attacks, but she does not take the 1 Direct Damage from her own card.
- Vs. Milady: If Milady reveals the "1 Damage to all" Intrigue, Milady and her Partner ignore the damage, but Ching Shih and her Partner take the damage. The "Heal Partner" Intrigue is ignored.

